
Adding font files to your WordPress server can speed up the load time of slow-loading fonts. Adding new fonts to your server involves two main steps:
- Adding the font files to the appropriate WordPress folder
- Adding a ‘font-face’ for each font file somewhere in one of your stylesheets
Neither of these processes are particularly difficult, but they can be tedious. If you have the font files downloaded, or you know where to download them, the two steps above will suffice. If you don’t know where to download the fonts, you may be able to find them in the “Network” tab of the Chrome Developer Tools.
Let’s get started. In the first step I will show you how to download the font from Chrome Dev Tools.
Downloading the Font File from Chrome Dev Tools
The following steps are summarized in the numbered list and the screenshot below.
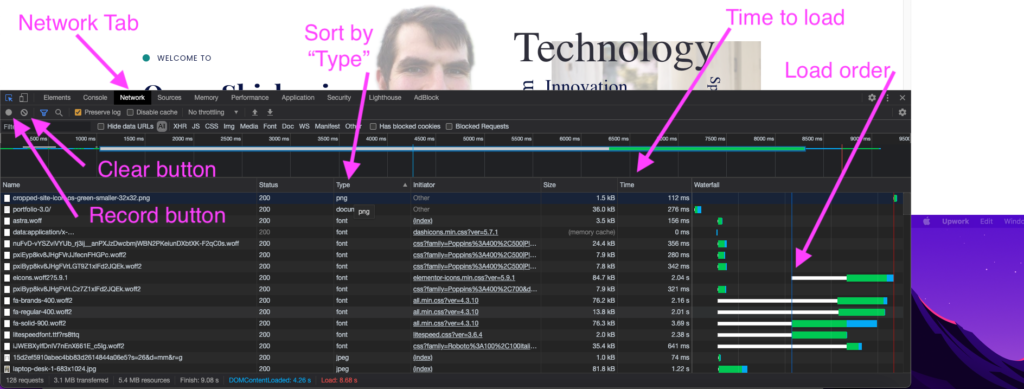
Using the Network tab, we can locate the slowest loading fonts on our site. We can open the Chrome Dev Tools with “ctrl/cmd + shift + C”. Then we want to navigate to the Network tab (see image below). We should wait a couple seconds to let the current page finish loading, then click the “Clear” button in the top left corner of the Network tab. Once we’ve cleared, we want to make sure the “Record network log” button has been activated (it will be colored red), and then we will hard refresh our site (so we can see where the fonts are actually coming from, and so they’re not stored in our browser’s cache. We can hard refresh with “ctrl/cmd + shift + R”. This will clear the browser’s cache for the current site while refreshing the page. We will now see the Network tab refill with requested files.
We want to wait until the majority of the activity slows down, then we can hit the red “Record network log” button again to stop recording (if we keep recording, the waterfall bars will grow smaller and smaller as final small files trail in, and this will make the waterfall bars harder to read). We then sort the results by “Type” by clicking on the “Type” tab within the Network tab. We can then scroll down through the alphabetically ordered types until we get to “font” and here we will see all of our loaded fonts, with each one displaying their respective load time under the “Time” tab, and their order of loading under the “Waterfall” tab (see image below).
Summary of above steps:
- Open Chrome Dev Tools (ctrl/cmd + shift + C)
- Navigate to “Network” tab
- Wait a few seconds for page to complete it’s loading (until requests stop coming in so fast)
- Click the “Clear” button (the circle with a line through it in the top left of Network tab)
- Make sure the “Record” button is activated (should be red, also in top left of Network tab)
- Hard refresh page (ctrl/cmd + shift + R)
- Let results populate for several seconds
- Press “Record” button again to stop recording, so waterfall doesn’t get too stretched out from very slow loading resources.
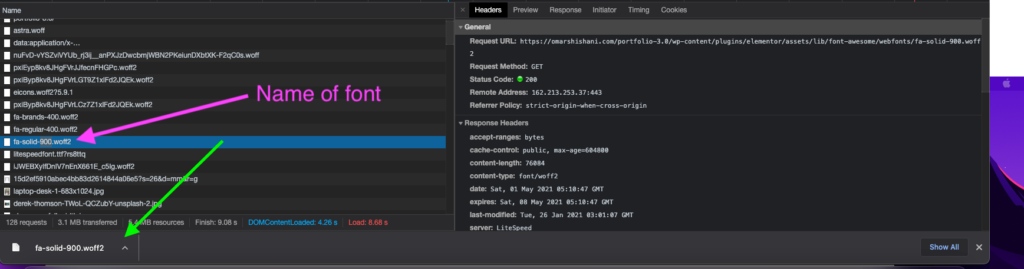
We can hover over the “Initiator” item for each font, and we will see the source URL for the file. We want to make sure that the source URL is external, and not already on our own site, e.g. “https://your-site-here.com/path/to/fonts”.
Double clicking the “Name” of the font in question will download the font to your computer’s “Downloads” folder:
Now that we have the downloaded font, the next step is to upload it to the server.
Uploading Font Files to the WordPress Server
Using a File Transfer Protocol like FileZilla, we can connect to our server and navigate to the proper “fonts” folder. All WordPress sites have a similar folder structure, and we want to add our font files to the “fonts” folder inside the folder corresponding to the theme we are using (both the parent theme or child theme works). The path should be something like:
“path-to-your-wordpress-folder-or-public_html/wp-content/themes/your-theme-name/fonts”
We can toss all of our downloaded font files in here. We need to note the names of the files, however, because we will use this in the CSS we are about to add.
Where to Add “font-face” to Your Stylesheet/CSS
We want to add a section of code to one of our CSS files used on the page which we need the fonts loaded on. We can add the font to our main stylesheet, create a new stylesheet and link to it, or simply use WordPress’ built in “Additional CSS” feature in the “Customize” interface. The last one is the easiest, so this is where we will add our CSS for this tutorial (Adding a new stylesheet for the fonts may require linking in header, and enqueueing the stylesheet in WordPress’ functions.php file).
If we start from the WordPress Dashboard, we can start our navigation in the left-hand sidebar, and go to:
“Appearance > Customize > Additional CSS (At the very bottom of left-hand menu in the Customize interface)”
Next we will write our font-face CSS. I like to write the code in a separate code editor to make it easier, so I will use VSCode. Our font face will consist of only a few lines, including the “font-family” and “source” properties. We first want to locate the correct font-family name for our font, as it is already being used in many places in our stylesheets.
Finding our font-family Name
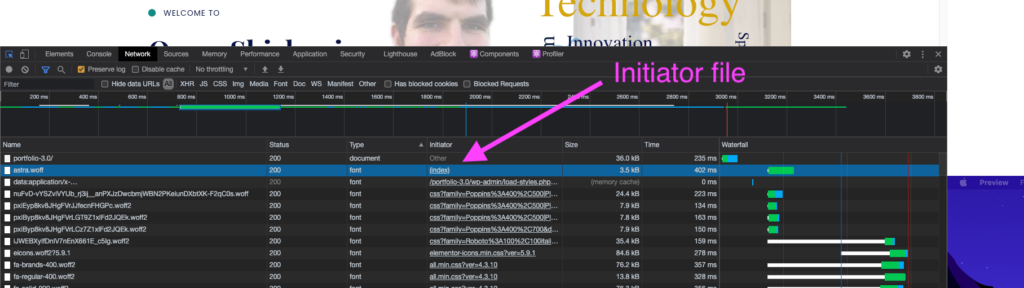
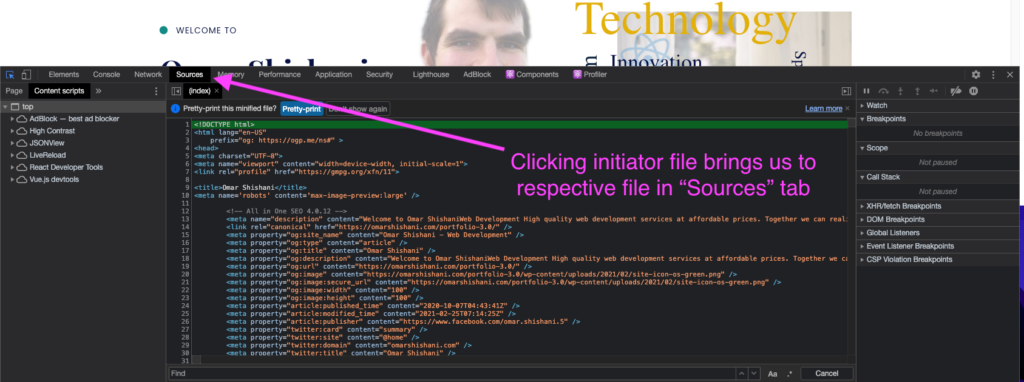
Our font-family is simply the name we want for our font. We should use the existing name for the font, which we can find in the existing font-face CSS on our site. This CSS code can be found in the file in the respective “Initiator” tab for the font. We want to highlight and copy the name of the font file first, and then click on the Initiator file. Once we click, Chrome Dev Tools will take us to the file in the “Sources” tab, and here we can search for the name of the font using “ctrl/cmd + F”. We will be brought to the line of code containing the current font-face (see images below):
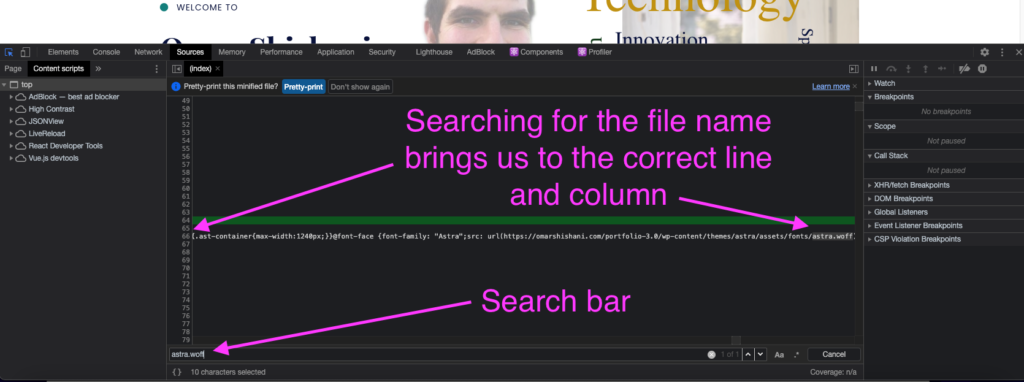
We can copy and paste this line into a code editor to make it much easier to read:
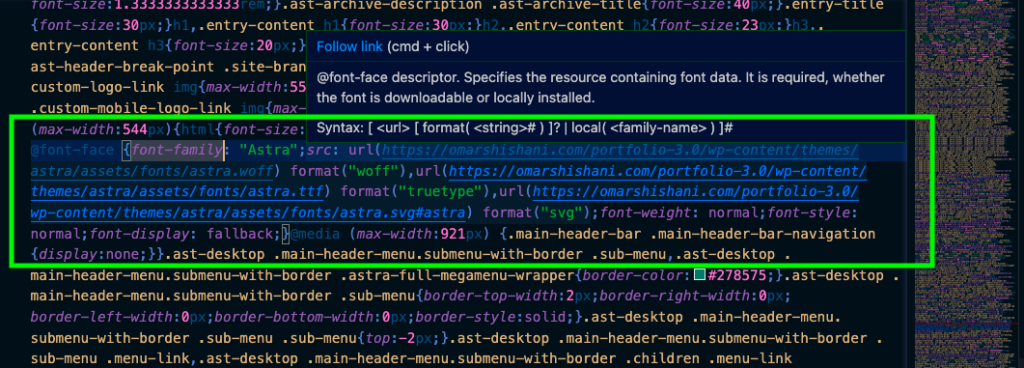
(NOTE that the fonts I am using in my example screenshots are already hosted on my WordPress server, with the parent URL https://omarshishani.com. If your fonts have the parent URL of your server, they are already hosted on the server and there is no point in moving them.)
Writing our font-face CSS
Now that we can see the font-family name, we can copy and paste it to create our new font-face. In addition, we will add a “src” to be equal to our path to our theme’s “fonts” folder. We also want to add ‘format(“woff”)’ or ‘format(“woff2”)’ or whatever file extension your font is in to the end of the “src” line:
@font-face {
  font-family: "Astra";
  src: url("/wp-content/themes/gillion/fonts/Astra.woff") format("woff");
}
Once we’ve completed our @font-face, we can copy and paste this code into the “Additional CSS” section of the WordPress Customizer. Once we click “Publish”, our font-face should load from this CSS, if our server’s source loads the font faster than the previously used external source.
Add a Preloader <link>
A last optional step we can do to increase the speed of our fonts loading is to add a “preloader” <link> line to our HTML’s <head> for each font. This will prioritize loading the fonts over other resources and make them load faster. These <link> tags can be added to our <head> by using a WordPress plugin called “Custom CSS & JS”, or by coding it into the theme’s header.php file. The <link> tag should appear as follows:
<link rel="preload" as="font" href="/wp-content/themes/gillion/fonts/Astra.woff" type="font/woff" crossorigin="anonymous"> Adding one of these for each of our fonts will speed up the loading of these fonts. Adding this preloader can load the fonts before the webpage’s rendering software starts running, which will improve overall page load speed. Read more about preloaders on the Mozilla Developer Network.
Re-check the Network Tab
Once we have added our files and CSS, we should go through the above process for loading all of the resources in the Network tab once again. We should see the fonts we’ve uploaded, listed by the file names we used to upload them. We can hover our mouse over the “Initiator” tab to check that the source has now been changed to our WordPress server/site (“https://our-site.com/path/to/fonts/font-file.woff”).
That’s It!
Congratulations! Hopefully your slow-loading fonts are now loading faster, and you have one less thing slowing down your overall page load speed! ?

Image Credits